Automate AppGallery releases with GitHub Actions (2/2)
hmsandroidgithubgithub actions
Our goal is to upload the freshly generated, signed APK to AppGallery automatically from GitHub Actions.
In the first part of this guide we set up the process, handled the sensitive information safely and ended up with a correctly signed APK, ready to publish to AppGallery. You can read it here:
Automate AppGallery releases with GitHub Actions (1/2)
To get there we will use the Publishing API, part of the AppGallery Connect APIs.
Publishing API
Among other things, this API lets us create a new application record in AppGallery, update the application information and upload files: an APK, an RPK (for QuickApps) or an AAB, but also icons and other assets.
We will use the file upload service, with the signed APK from part 1. But for that file to show up in AppGallery ready to be selected for a new release, a few steps have to happen first.
These are the steps:
- Get a token for the whole process.
- Get a valid URL to upload the signed APK.
- Upload the APK with the URL obtained in the previous step.
- Update the application information to announce that there is a new package uploaded in the previous step.
Each of these steps is a Publishing API endpoint.
Preparations
Before calling these endpoints we need to collect a few pieces of information.
Step 1 needs a Client Id and a Client Secret, which means creating a new API key in the AppGallery console. Sign in to AppGallery Connect, then go to Users and permissions > Api Key > Connect API.
Create an API key, either for every application or for a selected few.
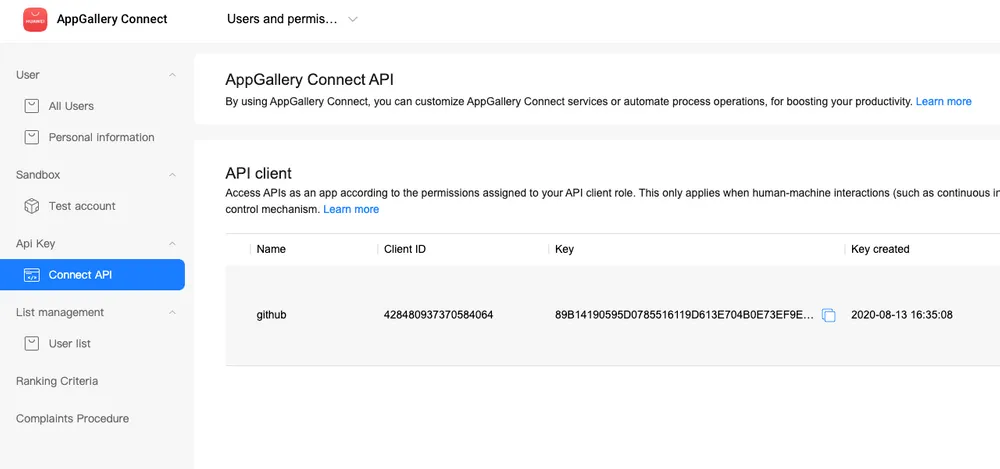
Once created, you can read the Client Id and the Key, which is our Client Secret. Both are sensitive.
We also need the App Id of the application we are uploading to. It is on the main page of the application in the console, and unlike the previous two, it is public, so it does not need to be kept secret.
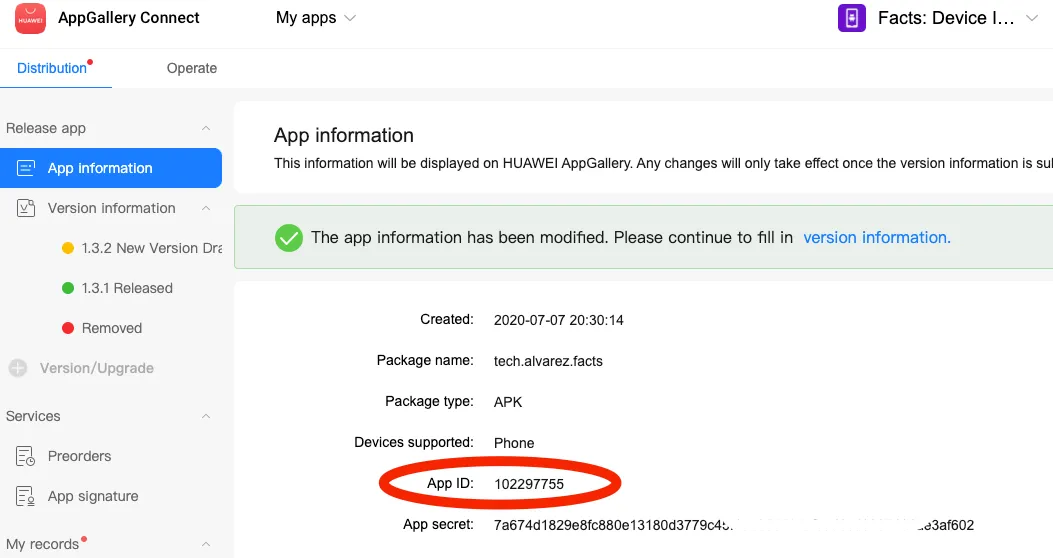
With that, we are ready to call the API.
The Script
We could call the endpoints from the command line with curl, but parsing the responses is much easier in a Python script, and the runner is an Ubuntu machine that already ships Python and pip.
Step 1: Get a token to perform all this process
We will use requests for the HTTP calls, with one function per step. Each one is written as simply as possible, with no validation, to keep the focus on the flow.
import requests
import sys

def get_token(client_id, client_secret):
    url = 'https://connect-api.cloud.huawei.com/api/oauth2/v1/token'
    body = {
        'grant_type': 'client_credentials',
        'client_id': client_id,
        'client_secret': client_secret
    }
    response = requests.post(url, json=body)
    if response.status_code == 200:
        json = response.json()
        return json['access_token']
    else:
        print('token: ' + str(response.status_code) + ': ' + response.reason)
That returns the token we will use for the rest of the process, starting with the next step.
Step 2: Get a valid URL to upload the signed APK
This is where the App Id comes in, and the parameters declare the type of file we are about to upload, an APK in this case.
def get_upload_url(access_token, client_id, app_id):
    url = 'https://connect-api.cloud.huawei.com/api/publish/v2/upload-url'
    params = {
        'appId': app_id,
        'suffix': 'apk'
    }
    headers = {
        'client_id': client_id,
        'Authorization': 'Bearer ' + access_token
    }
    response = requests.get(url, params=params, headers=headers)
    if response.status_code == 200:
        json = response.json()
        return json['uploadUrl'], json['authCode']
    else:
        print('upload-url: ' + str(response.status_code) + ': ' + response.reason)
The function returns the URL we upload the file to in the next step, plus the authentication code that action requires.
Step 3: Upload the APK with the URL obtained in the previous step
This function performs the upload itself and only needs the path to the file. The maximum size for an APK is 4 GB; a larger one has to be uploaded in chunks through a different endpoint, described in: Uploading a File by Chunk
def upload_file(upload_url, auth_code, path_file, access_token, client_id, app_id):
    headers = {
        "accept": "application/json"
    }
    body = {
        'authCode': auth_code,
        'fileCount': '1'
    }
    with open(path_file, 'rb') as f:
        response = requests.post(upload_url, files={'file_name': f}, data=body, headers=headers)
        if response.status_code == 200:
            json = response.json()
            fileInfoList = json['result']['UploadFileRsp']['fileInfoList'][0]
            update_app_file_info(file_url=fileInfoList['fileDestUlr'],
                                 file_size=fileInfoList['size'],
                                 client_id=client_id,
                                 access_token=access_token,
                                 app_id=app_id)
        else:
            print('upload-file: ' + str(response.status_code) + ': ' + response.reason)
Step 4: Update the application information to announce that there is a new package uploaded in the previous step
We run this last step inside the previous function, so it fires as soon as the upload finishes. Uploading the file is not enough: we have to tell AppGallery that a new package is available for the app.
def update_app_file_info(file_url, file_size, client_id, access_token, app_id):
    url = 'https://connect-api.cloud.huawei.com/api/publish/v2/app-file-info'
    headers = {
        'client_id': client_id,
        'Authorization': 'Bearer ' + access_token
    }
    body = {
        'fileType': 5,
        'files': [{
            'fileName': 'this_is_a_new.apk',
            'fileDestUrl': file_url,
            'size': file_size
        }]
    }
    params = {
        'appId': app_id
    }
    response = requests.put(url, headers=headers, json=body, params=params)
    if response.status_code == 200:
        json = response.json()
        pkgVersion = json['pkgVersion'][0]
        msg = json['ret']['msg']
        code = json['ret']['code']
        print(str(pkgVersion) + ', ' + msg + ', ' + str(code))
    else:
        print('app-file-info: ' + str(response.status_code) + ': ' + response.reason)
Note that one of the parameters is the name the file is registered under. Here it is a constant, but it could be built dynamically from the version, the flavor, and so on.
Run the script
Running the script means calling those functions and passing in everything we prepared earlier. We read it from the arguments with the sys module:
app_id = str(sys.argv[1])
client_id = str(sys.argv[2])
client_secret = str(sys.argv[3])
path_file = str(sys.argv[4])
print(app_id, client_id, client_secret, path_file)
access_token = get_token(client_id=client_id,
                         client_secret=client_secret)
upload_url, auth_code = get_upload_url(access_token=access_token,
                                       client_id=client_id,
                                       app_id=app_id)
upload_file(upload_url=upload_url,
            auth_code=auth_code,
            path_file=path_file,
            access_token=access_token,
            client_id=client_id,
            app_id=app_id)
We commit the script to the repository so GitHub Actions can use it.
GitHub Actions
Now we only need to run the script from the CI/CD YAML file. Some of the data it takes is sensitive, and the answer is the same as in part 1: the repository Secrets.
Save the Client Id and Client Secret in Secrets, under the repository Settings.
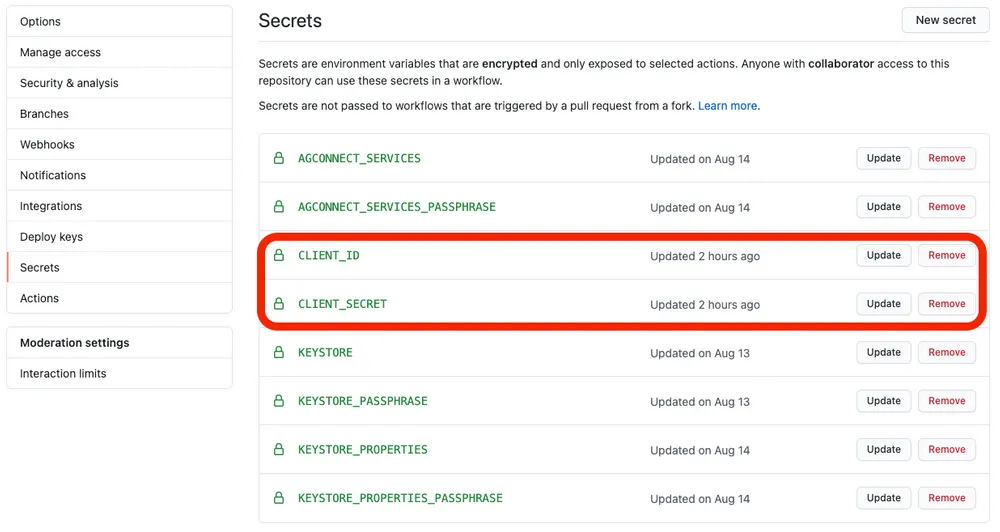
All that is left is to call the script.
- name: Run Script
  run: |
    python --version
    pip --version
    pip install requests
    python my_script.py "102297755" ${{ secrets.CLIENT_ID }} ${{ secrets.CLIENT_SECRET }} app/build/outputs/apk/release/app-release.apk
A few reminders: the App Id can be a parameter rather than a constant, and it is not private; secrets are read with ${{ }}; and the signed APK ends up at app/build/outputs/apk/release/app-release.apk.
The Result
On every commit to the branch, or on a manual run, the log shows the APK being uploaded. Note that no matter how hard the script tries to print a GitHub secret, the console only ever shows ***.
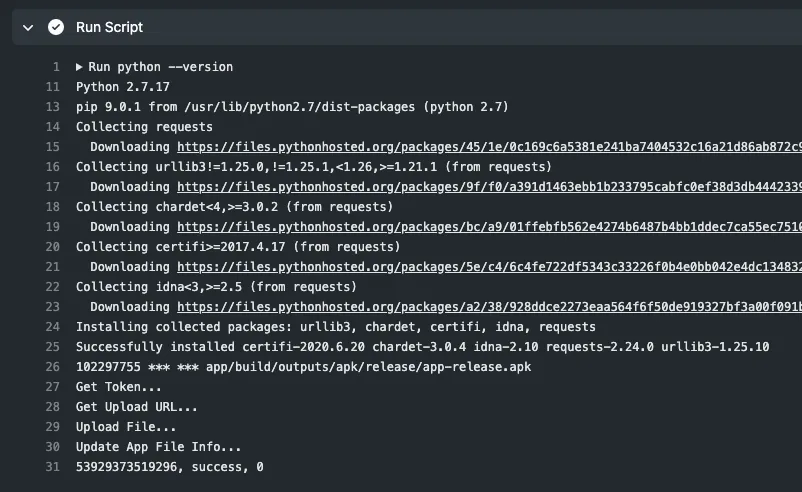
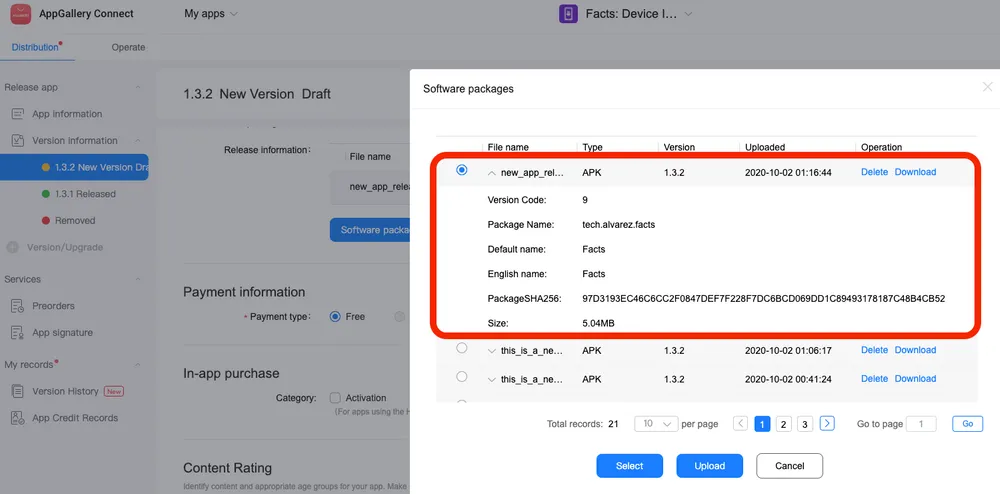
When it finishes, the AppGallery console shows the package that was uploaded automatically: a properly signed APK, ready for release. If it is a new version, a new section appears under Version Information.
Conclusion
Using the Publishing API we reached the goal: a process that is tedious to do by hand now happens on its own.
What’s next
To finish the process, the release itself could be pushed automatically, along with new screenshots, an updated description, a bumped version, or a build sent straight to a group of testers. There is a lot left to automate, and a lot of Connect APIs to do it with.
You can see the yml file here:
And you can see the script here:
Implemented in a real project can be seen in:
facts-android